MSP360 Products
Set up MSP360 Standalone Backup for Microsoft 365 and Google Workspace
With MSP360 Standalone Backup, you can back up and recover emails, files, and other services under Microsoft 365 and Google Workspace accounts. This guide will help you prepare to back up your data: purchase licenses, set up storage destinations, and configure your MSP360 account.
Note: MSP360 Standalone Backup is designed for secure, convenient backup of a single domain. It suits businesses, government, healthcare, education, finance, internal IT teams, and personal use. For managing multiple domains or organizations, use MSP360 Managed Backup for Microsoft 365/Google Workspace — a centralized solution for MSPs, resellers, and IT teams.
MSP360 Standalone Backup for Microsoft 365/Google Workspace supports the following types of Microsoft and Google Workspace accounts:
- Microsoft 365 Business - for companies of any size managing their own Microsoft 365 environment.
- Microsoft 365 Personal, for individual users who want to back up personal email, files, and calendar data.
Note: SharePoint and Teams licenses are not available for Microsoft 365 Personal accounts. Additionally, you cannot add other users — only the primary account can be backed up.
- Google Workspace - for individuals, businesses, and non-profits institutions using Google services under a single domain.
Connect MSP360 Backup to Microsoft 365 / Google Workspace account
For Microsoft 365
- Fill out the Signup from
- If you already signed up, login to the Dashboard
- Choose your Microsoft or Google Workspace account type: Microsoft 365 Business, Microsoft 365 Personal, Google Workspace
Note: Be careful, if you use Microsoft 365 Personal, do not try to login using the Microsoft 365 Business account type button.
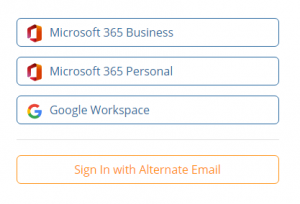
- Sign in using your Microsoft 365 credentials (for first-time setup, use the Global Administrator account). Refer to the Dashboard chapter in our help documentation for detailed information.
Setup Google Workspace Backup
Configure trusts for apps.mspbackups.com requested by Google as described:
- Sign in to Google Admin Console as a super administrator.
- Click Main Menu > Security > Access and data control > API Controls > Manage Third-Party App Access
- Add the following OAuth Client IDs as trusted applications:
- 101545705208641292657
- 76254656058-ue8d5fkuicrfjjhd8c1qngd2goaq3ngs.apps.googleusercontent.com
- Ensure access type is set to: Trusted: Can access all Google Services
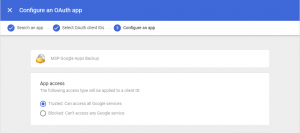
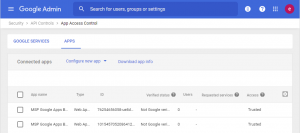
Added applications will be visible in the Connected apps grid with the Trusted status
- Open the Dashboard
- Select Google Workspace.

- Sign in with Google credentials (for first-time setup, use the Super Administrator account). Refer to Dashboard chapter for detailed information.
Install MSPBackups Application from GoogleApps
When you enable backup services for the first time in the Service Dashboard, you will be redirected to the Google Workspace Marketplace to install the MSPBackups Application to your domain. This application is required to manage permissions and operations for your Google Workspace backup. After installing the application use the link apps.msp360.com to return to the backup portal to continue the backup set up.
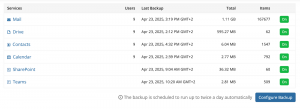
MSP360 Backup for M365 / Google Dashboard Overview
The available dashboard features depend on your account type.
For Microsoft 365 Business the dashboard includes:
Users, Payments, Mail, Drive, Contacts, Calendar, SharePoint, Teams, and Reporting.
For Microsoft 365 Personal, the dashboard includes a simplified menu:
Payments, Mail, Drive, Contacts, Calendar, and Reporting.
Note: Users, SharePoint, and Teams are not available for this account type.
For Google Workspace the dashboard includes: Users, Payments, Mail, Drive, Contacts, Calendar, Shared Drives, Reporting
Configure Your Administrative Account
- Open Dashboard.
- In user menu select My Account.

- In Contact Info, provide your contact details.
- Add an alternate email in Set up alternate email area add an alternate email. A strong password for alternate email is required. We will send an email message to specified alternate email for verification purposes. Please confirm it via the verification link sent.
- It is recommended to turn on Two-Factor Authentication (2FA).
- In Set up storage area, add a storage account by
• Selecting your storage provider in Storage Type
• Filling in required details and testing the connection. You will see Successfully connected in case your access is confirmed.
- Once you are done with editing, click Save and confirm your settings.
Note on Long-Term (Archival) Cloud Storage Usage
Long-term (archival or cold) storage classes are not supported. If you make a decision to use these classes, you are responsible for all transitions and selection of long-term storage classes. We also are not responsible for manipulations with the storage by the user and for the costs associated with these operations.
- Long-term storage classes (e.g., S3 Glacier, Azure Archive) may result in extended retrieval times (up to 48 hours for AWS Glacier).
- Retrieval costs may apply. The user assumes responsibility for selecting long-term storage classes and associated fees.
Manage Subscription
Purchase User Licenses
MSP360 Standalone Backup for Microsoft 365/Google Workspace is distributed on a per-user basis. All active users must be covered by your subscription. To back up more users, increase the user limit by purchasing additional seats. This plan allows backing up the following services: Mail (Exchange Online), Drive (OneDrive), Calendar, and Contacts for the user who is assigned the plan. To back up SharePoint, Teams or Shared Drives, you should add the appropriate feature to the subscription plan of the administrative account.
The following subscription plans are available:
- Premium 1 month
- Premium 6 months
- Premium 1 year
To purchase subscription plans, proceed as follows:
- Open the dashboard
- Click Payments in the horizontal menu. If you already have a trial or commercial subscription, please check their expiration dates to identify the required quantity of subscription plans.
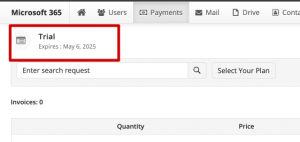
- Click Select Your Plan. You can see your current subscription plan, if any, and available subscription plans to select.
- Select the required subscription plan
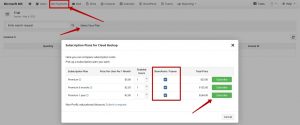
- For Microsoft 365 Business/Google Workspace product edition, select the required configuration;
- Enter the number of additional users you want to include in the backup project
- For Microsoft 365 select SharePoint/Teams check box to perform SharePoint and Teams backup
- For Google Workspace select Shared Drives check box to perform Shared Drives backup
- For Microsoft 365 Personal product edition, select the subscription plan:
- Premium 1 month
- Premium 6 months
- Premium 1 year
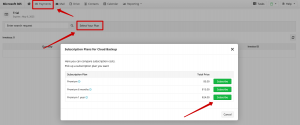
- Click Subscribe. You will be redirected to the MSP360 store to proceed with payment.
Manage Payments
The following information is displayed on Payments page:
- Current subscription plan type
- Date of next payment (subscription renewal)
- Total price per subscription period
- Select Your Plan button to subscribe
- Edit Subscription button to add users/services
- All payments history:
- Unpaid invoices prepared for your domain to simplify the subscription process
- Paid invoices in progress
- Successfully processed paid invoices.
Manage Subscription Users
All active users should be covered by a subscription plan. If the user limit doesn't cover all users that you need to backup then increase the user limit by purchasing extra seats for your subscription. When a user is disabled in the backup settings, their slot becomes available and can be reassigned by enabling backup for another user. A deleted user is marked with a (deleted) note. For these users, an inactive status is displayed. Their slot also becomes available for reassignment.
Subscription Expiry
If a trial or commercial subscription expires and is not renewed, backup data will be deleted in 90 days automatically. No backups will be performed for such users.
If a trial or commercial subscription expires and is not renewed and there are no available subscriptions in the pool, a Not available status is set to that subscription.
Edit Subscriptions
Change Payment Method
To change your payment method on the Payments click Subscription Details.
You will be redirected to the FastSpring store. Click Edit Subscription and select Update Payment Method to make the required changes.
Change Your Contact Data
To change your contact data on the Payments, click Subscription Details.
You will be redirected to the FastSpring store. Click Edit Subscription and select Change Address to make the required changes.
Expand Your Subscription
Note: This option is available only for Microsoft 365 Business and Google Workspace users.
To add additional users (user licenses) to your subscription and / or allow SharePoint/Teams or Shared Drives backup, on the Payments click Edit Subscription

User limit displays the maximum number of users you want to include in the backup project.
Make your choice and click the shopping cart icon next to the plan to proceed with the payment.
Cancel Your Subscription
To cancel your subscription, on the Payments click Subscription Details.
You will be redirected to the FastSpring store. Click Edit Subscription and select Cancel Subscription. You can still use the cancelled subscription until the end of the paid period, but the next payment will not be charged. Backup data will be available in the product user interface for 90 calendar days and then will be deleted after the end of paid period, but no backups will be performed.

You can select a new subscription, only after the paid period ends.
Add Users
Note: This option is available only for Microsoft 365 Business and Google Workspace users.
- In the horizontal menu bar, select Users.
- In the actions menu to the right click Sync Domain to see the up-to-date list of users.

- Select the users you want to add to the backup and restore routines
- Enable backup for the selected users on the pane to the right.
- Or Click Add All to Backup to add all enabled users to the backup and restore routines.
Note: Use caution when clicking Add All to Backup — this action will include all users in your account, not just the currently selected ones.
Configure Your Backup
You can configure your backup services using the Configure Backup button.
- Сlick the Home tab in the top-left corner of the MSP360 console.
- Click the Configure Backup button.
- Select the services to be backed up. By default, the backup is turned off for all services.
- Sign in to the product as admin and follow the on screen instructions.
- Grant required permissions for the application, as requested by Microsoft 365 or Google Workspace.
Note: By default, the backup is scheduled to run up to twice a day automatically.
Further reading Top 6 Critical Mistakes in Microsoft 365 Data Protection
