In the last article, we went over addressing a compromised account, taking the response actions to ensure the account is safe and back under the end user’s control.
Now, as a follow up to the previous article, we will review the actions needed to properly secure an Office 365 tenant. These steps are geared towards MSPs who manage multiple Office 365 tenants and require some level of automation to configure Office 365 tenants in bulk.
Table of Contents
The steps that follow should be considered as a baseline for an Office 365 tenant and can always be complemented with your own considerations for additional protection policies. And, as Microsoft provides more protection features in conjunction with the ability to provide those features using an automated method such as Powershell, we will update the article accordingly to include them. For now, we are focusing on features that can be readily provisioned and configured with PowerShell.
These steps will be divided into three separate articles with this being the first.
Further reading Securing Your Office 365 Tenants. Part 2
For the PowerShell commands that will follow in this article, you will need to connect to Exchange Online or MSol Service. To do so, I have prepared a helpful connector script that can be run across all tenants, a specific tenant, or with direct admin credentials for a specific tenant. Please refer to the first article here to locate that initial script.
Further reading Just Got Hit With Phishing. Now What?
Auditing
Out of all the different protections you can have in place for an Office 365 tenant, or any environment auditing is definitely something that should be top on your list. The ability to track and review changes made by end-users or admins is vital in determining the source of issues related to those changes.
By ensuring auditing is enabled, you will be able to see if users have been compromised based on some notable behaviors like creating inbox rules to delete emails, forwarding the email to external addresses, and other suspicious activity.
The good news is, starting since January 2019, according to this article by Microsoft, mailbox auditing is now enabled by default. Please take a look at that article for more details about what mailbox activity is recorded by default.
While mailbox auditing is great, there happens to be another type of auditing that is not enabled by default. It’s called the Unified Audit Log. You can enable auditing for this by running the following 2 commands in Powershell after connecting to a direct Office 365 tenant:
Enable-OrganizationCustomization
Set-AdminAuditLogConfig -UnifiedAuditLogIngestionEnabled $true
Unfortunately, the commands only appear to work when running with direct admin access for a specific tenant. It doesn't seem to work when running with delegated partner admin access defeating the purpose of running this in bulk across all your Office 365 tenants. To address that issue, GCITS has taken the liberty to come up with a script that runs across all your Office 365 tenants and creates a temporary admin user against each of them using your partner credentials, runs the above command to enable auditing, then thereafter removes that temporary admin user. The solution they provided is split into 3 scripts. You can review their solution.
Renaming “admin” Accounts
Well, if you’re like me, at one point or another, you have been using the typical nomenclature for naming an admin account by including the word “admin” in the username. While it makes it easy for us IT admins to distinguish it from regular user accounts, it also makes it easy for hackers to look for such accounts and try to break in. A simple way to close this security hole is to come up with a different naming scheme for admin accounts that only your team would recognize. You could come up with something straightforward like “KeyChief” or something more playful like a character from a movie or TV show like “Chloe O'Brian”.
Here’s a helpful script that can be put together to get a list of accounts that contain the name “admin” AND that is not synced with an on-premise AD.
Changing attributes for Office 365 accounts typically only work for accounts that are not synced with Azure AD Connect. If your admin accounts are connected with Azure AD Connect, you will have to change the display name, user name, UPN, and email address using Active Directory for the connected forest.
$tenantid = 'Use_Main_Script_To_Run_This_Script_And_Get_Tenant_ID'
$SearchStr = "admin"

# This will get a list of all users that have the string
# in the UPN or display name as defined in the $SearchStr variable above.

$adminusers = Get-MsolUser -SearchString $SearchStr -tenantid $tenantid

# This will return results that are not synced with AD
$adminusers | ? {$null -eq $_.LastDirSyncTime}

# This will return all results including accounts synced with AD
$adminusers
Once you get a list of the admin users you would like to change the display name, first name, last name, and UPN attributes for, you can compile a simple script using Set-MsolUser and Set-MsolUserPrincipalName to change their respective attributes.
Setting The Password Expiration Policy
Next up is setting a password expiration policy for your Office 365 tenants. Before proceeding, be sure you have done your research on what policy is needed for each of your clients as some compliance organizations have different requirements. For instance, PCI requires passwords to expire after 90 days. However, many would argue that expiring passwords is ill-advised and unnecessary unless a breach is detected-I would have to agree with that logic. As such, the command below sets passwords to never expire but you can always change the ValidityPeriod to a different value in days.
Set-MsolPasswordPolicy -TenantId “UseMainScriptToGetTenantId” -ValidityPeriod 2147483647 -NotificationDays 30
Azure Conditional Access Policies
Well, this is going to come as a disappointment, but Microsoft currently does not provide a way to set up Azure Conditional Access Policies (we’ll just use ACAP going forward) using Powershell and cannot be automated. That means, what follows next will need to be done manually for each of your managed Office 365 tenants.
You will need to have an Azure AD Premium P2 license assigned to your admin account in order to take advantage of ACAP with the ability to block sign-ins based on risk level. Otherwise, for just basic ACAP functionality which will allow us to block sign-ins based on geolocation, Azure AD Premium P1 is sufficient.
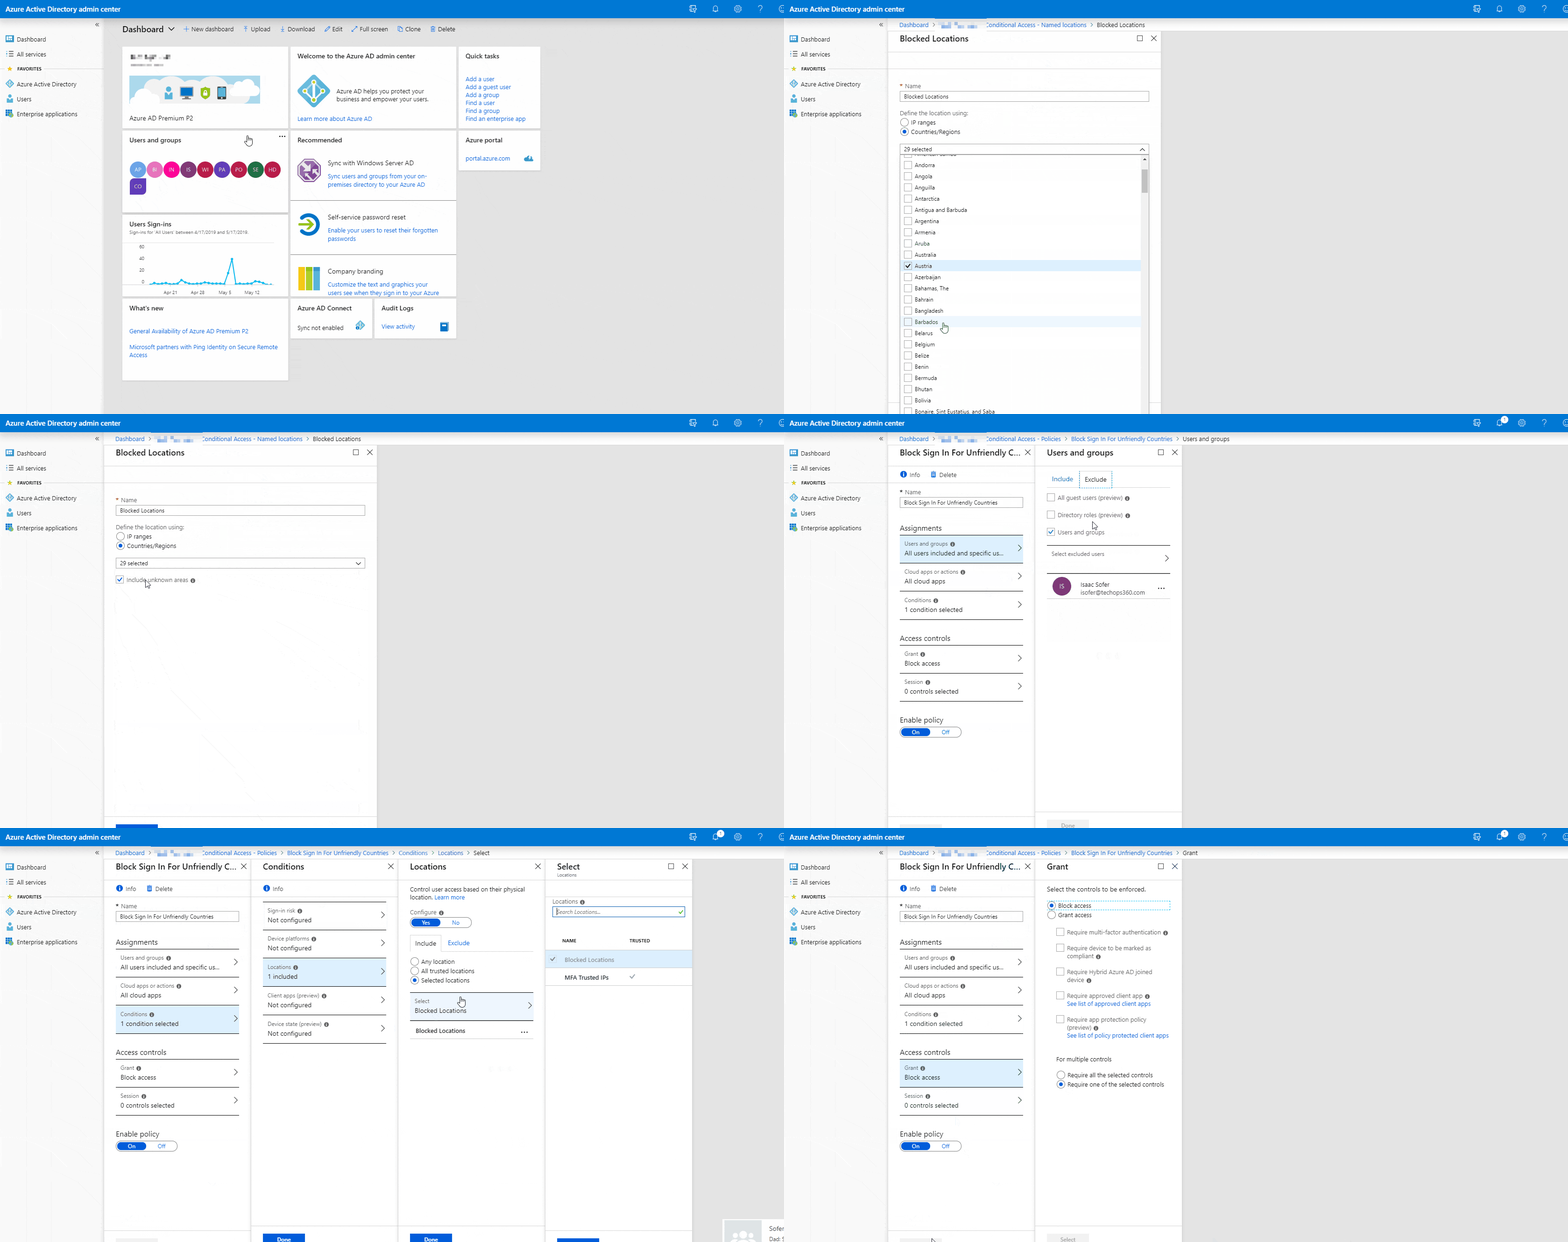
- Take a look this GIF for a walkthrough and follow along with the steps below:

Log on to your client’s Azure portal - Navigate to Active Directory
- Click on Conditional access under the Security section
- On the panel that appears, click on Named locations
Create a New location and name is something like Blocked Locations - Define the location user Countries/Regions
- Select all the countries you would like to block
- Check Include Unknown areas - Save
- Go back to Conditional Access Policies
- Create a New policy
- Name it something like Block sign in for unauthorized countries
- Select which users or groups you would like to assign this too
- I would recommend selecting all users and excluding the admin users ONLY if they have MFA enabled - Select the Conditions to apply it to the Named location you created earlier
- Under Access controls > Grant > select Block access
- Thereafter you can choose to enable the policy now and click Save
I would also recommend creating an additional policy based on the sign-in risk level. For instance, you can choose to require MFA for a sign-in risk level of Medium and block access for High-risk level sign-ins.
Summary
Unfortunately, Microsoft hasn’t provided us IT admins much in the way of proper tenant protection and automation. It’s discouraging to learn that they require you to purchase an Azure Premium License for basic protections that are a bit half-baked. Most notably missing is proper and simple brute-force attack prevention. There are IT admins that have provided proof-of-concept successful brute force attacks using basic Powershell commands. A simple safeguard like locking out a sign-in after multiple bad password attempts is just one of the things that should have already been implemented by Microsoft. Yet, while there is a default lock-out policy enabled in Azure, it doesn’t seem to prevent the Powershell-based brute-force attacks that were tested. I hope they continue to enhance their current protections and provide proper brute-force attack prevention sooner than later. Attacks have only been increasing in volume, getting craftier, and at times are getting past the current Office 365 protection measure. Relief can’t come sooner enough!
These was just some of the things you can do to quickly secure an Office 365 tenant. The next article to follow will focus on Spam and Phishing protection policies.
Further reading Securing Your Office 365 Tenants. Part 2


