BackBlaze B2 cloud storage has launched a data import program - the BackBlaze Fireball. It helps to upload large volumes of data using a physical appliance, shipped to the customer. This is a step-by-step guide on how to set up BackBlaze B2 Fireball and synchronize data with it.
About BackBlaze Fireball
Fireball is a Synology NAS with hard drives shipped to from BackBlaze datacenter. You then need to:
- Set up the appliance
- Connect it to your network
- Upload data to the applianc
- Verify the process
- Send it to BackBlaze
- Synchronize MSP360 Backup with your BackBlaze bucket
Read the detailed step-by-step to the BackBlaze Fireball further in the article
After that, you can backup the changes in your data, instead of the whole dataset. That speeds up the initial upload process in two particular cases:
- Dataset is too big
- Internet connection is too slow
BackBlaze Fireball Price and Capacity
- The maximum capacity of one Fireball NAS device is 96TB
- The network connections include 1GigE and 10GigE
- Monthly rental fee is $550, shipping fee is $75
- Refundable deposit is $3,000. It will be refunded once BackBlaze receives the NAS device. Any damages to the device are charged from that deposit
How to Order the BackBlaze Fireball NAS
1. Sign up for BackBlaze B2 or sign in to the existing account
2. Choose the Fireball option
3. Click Order a Fireball
4. You will need to enter your credit card information and create a bucket for the data, you are going to upload.
5. Once you’ve entered credit card information, go to Buckets and click Create a Bucket
6. Once the bucket is created you can order a fireball. Click Order a Fireball again and complete the instructions
Initial Seeding with BackBlaze Fireball and MSP360
1. Unpack and Set up the NAS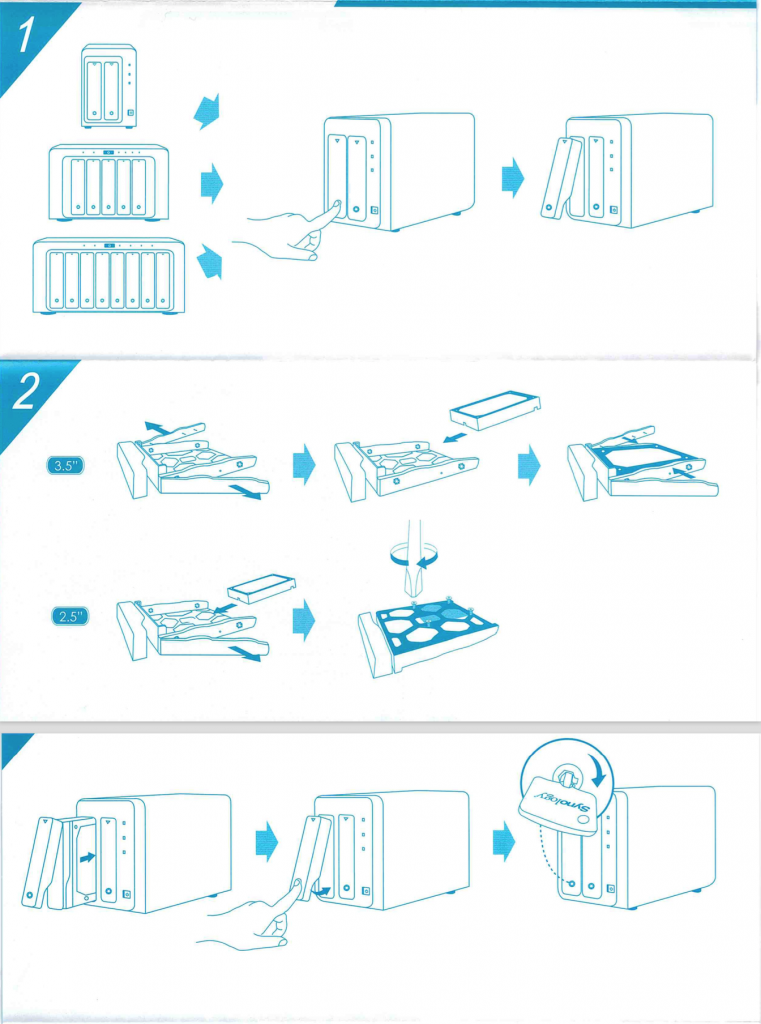
2. Connect the Fireball NAS directly to the switch or a router.
Do not connect NAS to a computer, it won’t work. Also, we don’t recommend a wireless connection as it limits the speed of the data upload
3. Install Synology Assistant to a computer, connected to the same network. This software is required to register the Fireball NAS.
4. Open the Assistant, find the NAS device, double-click it to open the login page
Enter the username and the password. Username for all Fireball devices is backblaze. To get the password login to your B2 account, navigate to Fireball, click the ‘i’ icon, associated with the Fireball order.
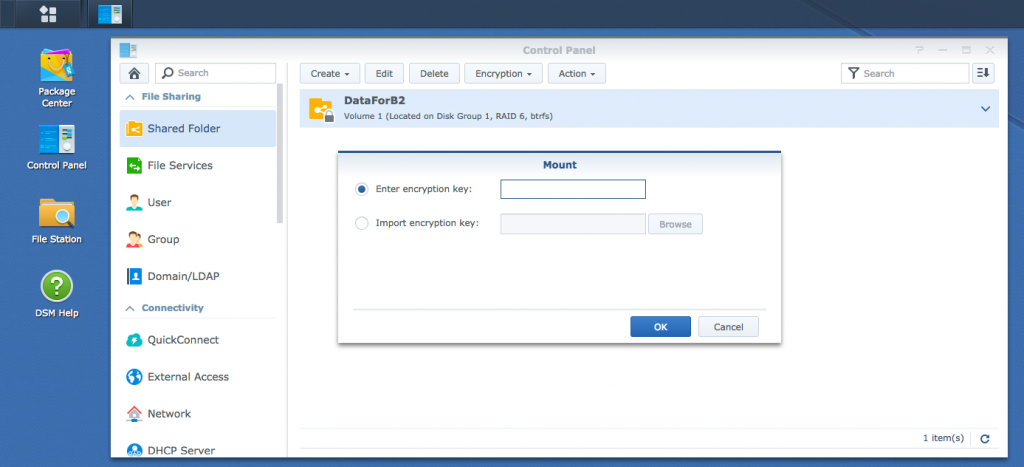
5. Enter Fireball Encryption Key
All Fireball NAS devices are encrypted to provide data protection. Every time the NAS is powered down or reset, you need to re-enter the encryption key.
1. In the browser window, navigate to ‘Control Panel’
2. Navigate to ‘Shared Folder’
3. Click once on ‘DataForB2’ to select it
4. Click on ‘Encryption’
5. Choose ‘Mount’
6. Enter the provided encryption key
 There are several restrictions for filenames and file paths. Pay attention to the 8th step there.
For data upload, synchronization and backup we will use MSP360 Backup. You can download a 15-day fully functioning trial to test it yourself.
6. Install and run MSP360 Backup.
7. Open MSP360 Backup and add New Account
8. Select File System account, choose any Display name and specify the Path to the Fireball NAS Since it is a backup to the locally attached NAS, you need to select File System account. Your BackBlaze B2 account will be involved when your data is uploaded on the storage.
9. Create any backup plan, choose Local or Cloud Backup, click next and select the newly created File System account. Proceed with the backup plan wizard. Check out our help article for guidance regarding MSP360 Backup features and options.
Note that filename encryption must not be used for data backup to Backblaze B2 Fireball
10. Start the backup and wait till it’s finished
11. Sign into your previously created Backblaze account and navigate to the Buckets page.
Click Show Account ID and Application Key. On the next screen, click on the Create Application ID to display the current account’s application key. Backblaze does not save your Application Key. Once this window closes, the Application Key cannot be retrieved. Returning to this dialog will create a new Application Key, and invalidate the previous key
12. Configure a BackBlaze B2 connector from the NAS device. Log into the NAS device via previously used Synology Assistant. Click the main menu icon in the upper left and choose Cloud Sync. Select Backblaze B2, and enter the Account ID and Application Key. Select the needed bucket from the dropdown in the Bucket name area.
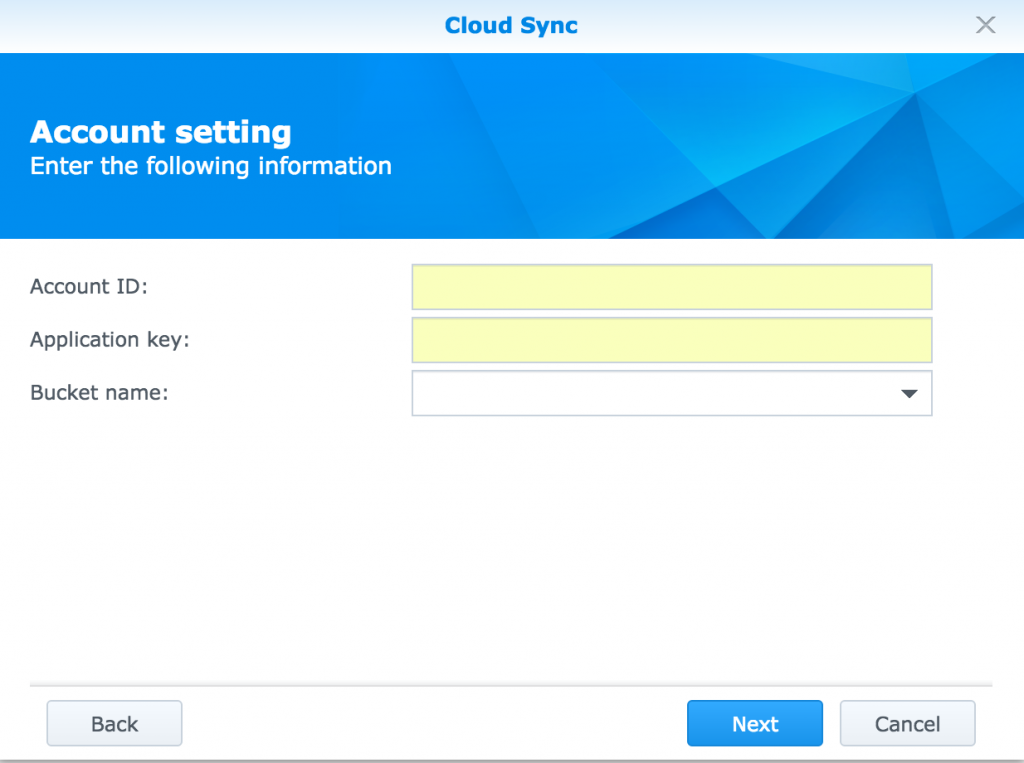
The cloud sync parameter should match the following:
Don’t select Data Encryption option. Otherwise, BackBlaze will be unable to upload the files. If you need additional encryption, configure it in MSP360 Backup.
13. Check that upload works. At this point, the NAS should start uploading files to B2. Login to your BackBlaze B2 account, navigate to Bucket and open the bucket you upload data to by clicking the Upload/Download button. You should be able to see synced files from the NAS in the Browse Files area.
Do not wait for all files to upload. Proceed to the next step.
14. Return NAS settings to default, and shut down the NAS. If you have changed any NAS settings, such as network settings, set them back to the defaults. This makes uploading the data easier when Backblaze receives the unit. Shut down the NAS from the Synology web interface.
15. Uninstall the hard drives, repack and return the Fireball to Backblaze. To ensure the integrity of the NAS and the hard drives, uninstall the hard drives from the NAS trays, repack the drives and NAS, and send them back to Backblaze. Once received, Backblaze will connect the NAS to an internal network, and complete the file upload at network traffic speeds.
16. Return the Fireball unit to: Backblaze Fireball Return, 500 Ben Franklin Court, San Mateo, CA 94401
17. Synchronize BackBlaze B2 bucket and MSP360 Backup. Add a new BackBlaze B2 account in MSP360 Backup
18. Specify your account details. Choose the bucket, you’ve uploaded data to via the Fireball NAS
19. Go to Tools, select Options and choose Repository. Click the Synchronize Repository button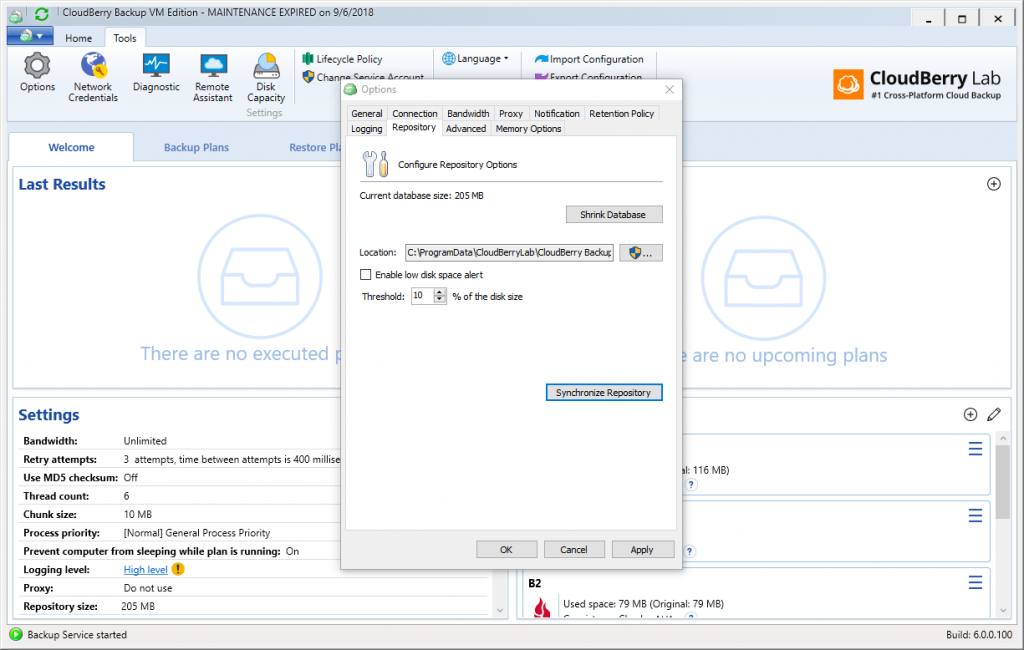
20. From the drop-down list choose your newly created BackBlaze B2 account. Click Synchronize now
21. Once synchronization is over, you can continue backup of your data to BackBlaze B2. From now on, you will backup only the changes in the data
If you have any questions about the backup to BackBlaze with a Fireball let us know in the comments or contact our support team.

