We are excited to announce that starting from this release, Windows Server backup software by MSP360 supports Image-Based Backup feature that significantly extends the capabilities of existing "Bare metal and System state" backup!
Please note that this article refers to MSP360 Backup 4.2 released in July 2015. It's different from the latest version of the product. You might want to check out our newer guide on image-based backup.

Compared to the previous versions, MSP360 backup 4.2 has some new outstanding enhancements in regards to the system backup and system restore functionality:
Support Windows Vista/7/8 desktop operating systems as well as Windows Server 2003/2008/2012 - Previously, you had to run Windows backup for non-supported operating systems and then run a file-level backup to the cloud. Now you can do an image-based backup of the desktop OS without any restrictions and additional manual actions.
Backup to the cloud directly - In the previous versions, MSP360 Backup required intermediate storage for bare metal/system state backups prior to uploading it to the cloud storage. Starting from now, MSP360 Backup sends the data directly to the cloud.
Include disk volumes into backup - MSP360 Backup now allows you to back up not only a system disk but also any other hard drive volume on your computer. You can include all the volumes in the backup plan in order to back up your system entirely.
Restore to Hyper-V or VMware (P2V) - In the previous versions of MSP360 Backup, you could restore only to a physical disk (P2P recovery). Now you have an option to recover your system to a virtual machine as well (P2V recovery).
Restore to dissimilar hardware - There is no need to keep an exact hardware configuration to be able to restore the system from the backup. A new image-based backup allows you to recover your system to a new computer with dissimilar hardware.
Let's take a closer look at the Image Based backup feature!
The Image-Based Backup Feature in MSP360 Backup 4.2
1. To take advantage of the Image-Based Backup feature, click Bare Metal button on the MSP360 Backup toolbar.

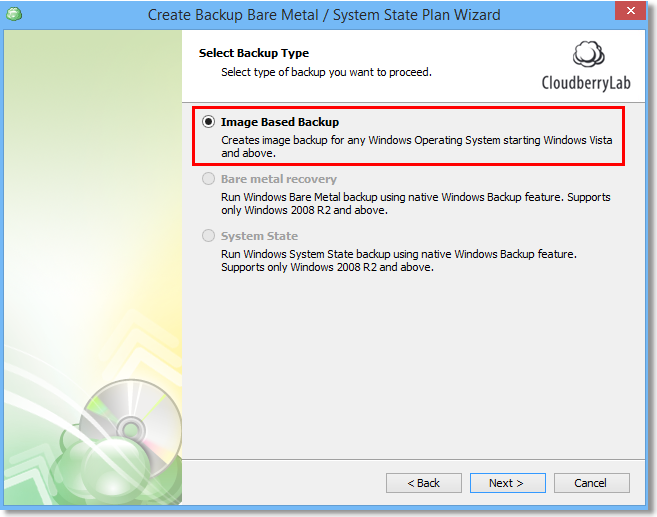
2. In the "Select Backup Type" step, choose an Image-Based Backup option and hit Next.

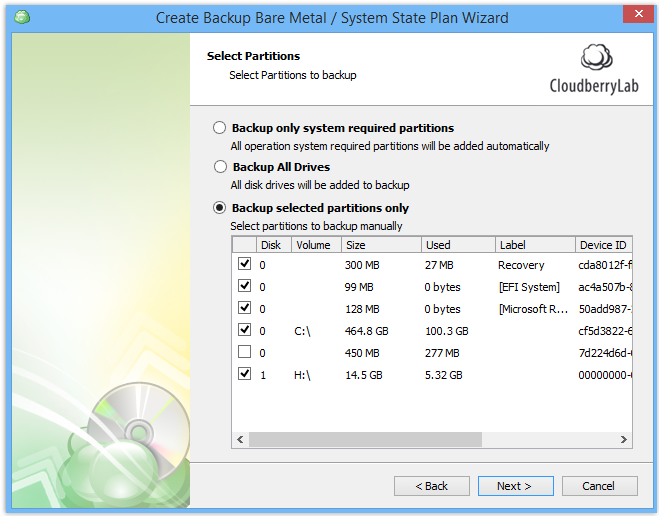
3. In the next step, you will be prompted to select the volumes to include them in the system snapshot. Select all the volumes you would like to back up and hit Next.

4. Complete the rest of the Backup Wizard steps to enable encryption and compression options, purge options, backup schedule options, and finally, run the backup job.
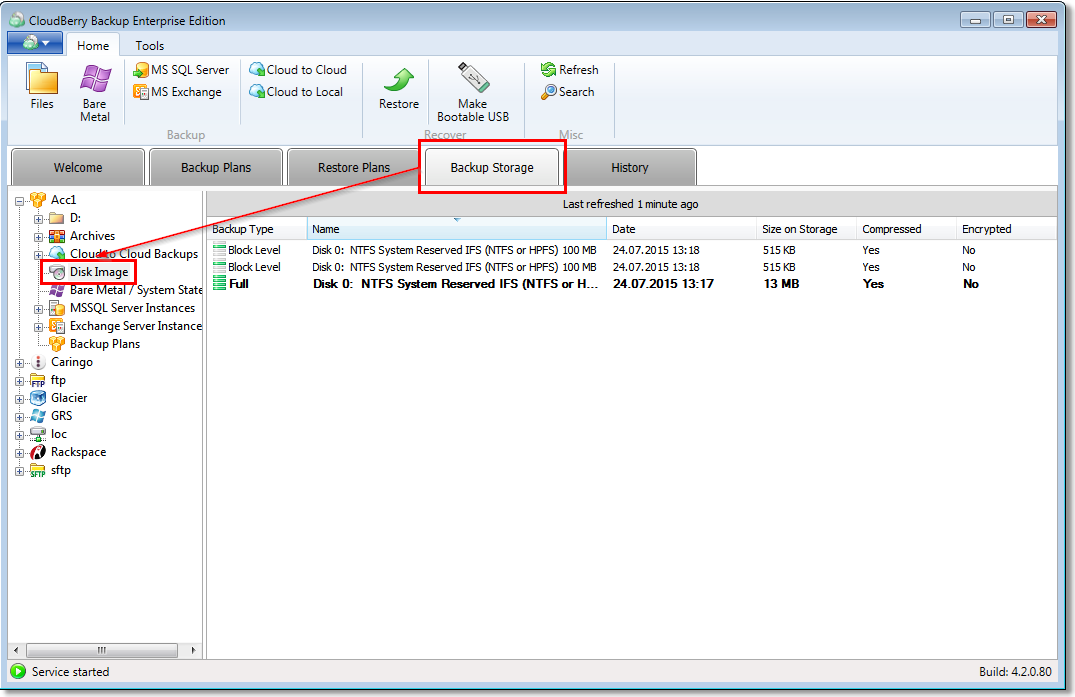
5. When the backup job is complete you can review the backed up system data by navigating to the Backup Storage tab. Then just expand your storage account and select Disk Image.

Note: By default, MSP360 Backup 4.2 performs block-level backups meaning that it first makes a full backup of selected files, and further on it simply monitors whether your files were modified or not. If they were modified, it identifies the particular modified blocks of the files and then just upload them to the cloud storage according to the backup schedule.
In our case, we performed a full backup of the system once (13 MB), and then after a little while, we uploaded two modified blocks of the system (512 KB).

As you can see, block-level backup functionality allows you to greatly reduce the backup space and backup speed since you do not have to back up the entire system every time you run the backup job. Instead, you just backup the modified parts of the system, called blocks.
+++++
You can try MSP360 Backup 4.2 with new features for free. Just download a 15-day fully functional trial version of MSP360 Backup for Windows Server and check if our backup solution meets your needs and requirements.


