In this post, we will figure out what is rotating drives backup scenario and how to use it with MSP360 Backup.
Rotating Drives strategy consists in regular copying data to the external media device, which is mounted each time when the backup job is performed. These devices subsequently swap each other and contain the full data copy, so rotation helps to reflect up-to-backup-date changes. When the drive with the old version of data is used for a backup again, all outdated blocks are overwritten.
This technique was first developed for the tape data repositories, where device rotation was the only way possible to keep data hot and provide versioning.
Now we have cloud storage and a bunch of local and offsite repository solutions which can substitute tape media. But in spite of parent technology decline, rotating drives routine is still in use as a way to increase a data durability.
Rotating drives strategy is commonly used in these scenarios:
- High durable physical offsite data storage.
- Big data volume maintenance and recovery, which must be restored quickly and reliably, so the numerous backup copies on different media are stored separately offline.
- In the controlled-access enterprises, where data can be stored only on authorized devices.
- For a long-term data storage with low access delay (e.g. monthly customer requests archive).
There are a lot of tactics for the Rotating drives backup scheme, as far as media suitable for it. With the aim of demonstration, we will use First In, First Out scenario, where the oldest data is replaced by the newest one and USB-sticks as storage drives.
How does it work?
The MSP360 Backup backup plan saves data incrementally: the initial seed is written during the first job and then data is updated with modified or new files. MSP360 Backup automatically recognizes the drives used for rotation within the backup plan, but it only uploads modified data by default. Normally it reduces time and networking expenses on classical backup, but it doesn’t suite for rotation strategy.
To deal with the issue MSP360 Backup has a Consistency Check feature, which analyzes the attached storage and reports for differences between its actual and expected contents. Thus the attached drive and repository metadata are synchronized and the next backup is also configured to upload all data needed to create a full copy on the rotating device.
How to Rotate the Drives with MSP360 Backup?
Important Note for Windows Clients: Rotating drives strategy is currently supported via command line interface.
Implemented in the version 5.9.4
1. Run command line interface. If you don't know how to run it, check out our CLI guide
2. The command syntax: -sync Sync before run. Possible values: yes, no(default)
3. If you don't have a plan that considers a rotating drives scenario, run the command: cbb editBackupPlan -n "Plan name" -sync yes
4. This parameter is supported for addBackupPlan.
If you need any assistance - don't hesitate contacting our support team.
We are planning to implement GUI support of rotating drives scenario during 2019
Important Note for Linux / Mac Clients: Rotating drives strategy is currently supported only via CBB file edit.
For Linux and Mac, you can use this method for force a Sync before backup:
1. Please navigate to the product configuration folder (e.g. /opt/local/Online Backup/etc/plans)
2. Find and open the .cbb file that relates to the backup plan (there is a <name> tag in the .cbb where you can identify the plan)
3. Change the line <syncbeforerun>false</syncbeforerun> to <syncbeforerun>true</syncbeforerun> and save your changes
This option forces MSP360 to synchronize the repository (via a consistency check) before a backup runs.
Now when we know the basics, let’s automate the rotating drives routine.
- Create new account. Press the Main Menu button and select Add Account.
- Choose File System as the account type. It is also possible to use any other type if needed.
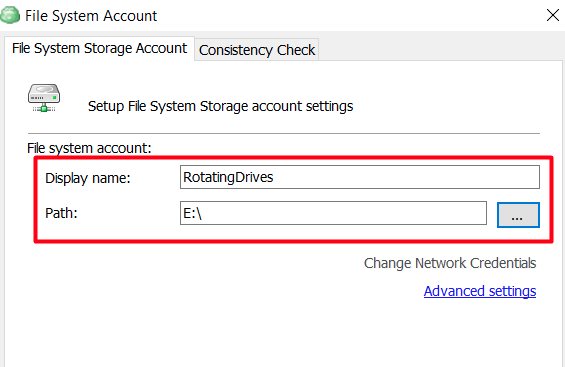
- In the new window specify the Display Name and the Path to the rotating device. Now the endpoint is ready, and we can configure the backup.

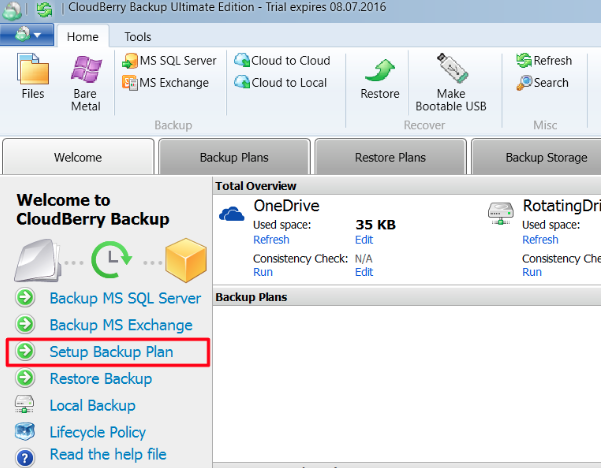
- Now create a new backup plan by clicking on Setup Backup Plan in the Welcome tab.

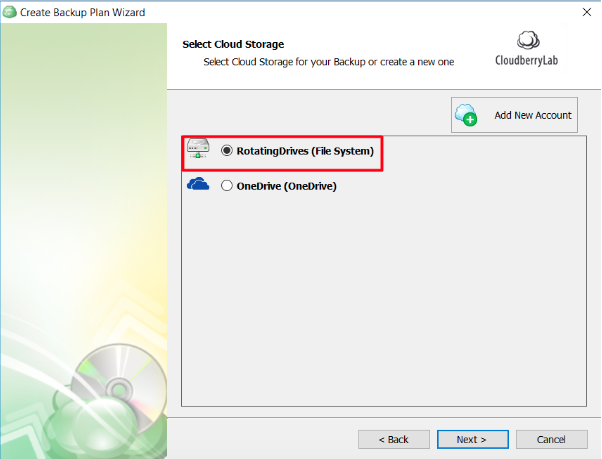
- Proceed the steps of the Wizard appeared to configure the backup. On the Select Cloud Storage step, choose Rotating Drives account. Set other options on your own till reaching Pre/Post Actions step.

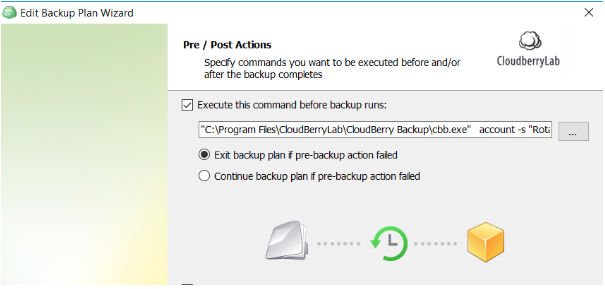
- Now we should write a script, which runs Consistency Check each time before a backup. Check off “Execute this command before backup runs” and write: "C:\Program Files\CloudBerryLab\CloudBerry Backup\cbb.exe" account -s "RotatingDrives" Where C:\Program Files\CloudBerryLab\CloudBerry Backup is the CloudBerry Backup installation folder and RotatingDrives is the account name.

Note: if you use “encrypt filenames” option, add -syncpassword "password" to the script, where password is the encryption password. - Adjust notification settings and finish the Wizard.
- To start rotating drives backup, plug in the device, go to Backup Plans tab and run the newly created backup plan.
Note: If everything goes right, the Last Result of the backup will be shown as “Success”. The result of consistency pre-check shouldn’t be taken into consideration - it’s okay when it displays Failed status or shows warnings. It means that some of files were missed on a current destination drive.
To rotate second, third and all the other devices, repeat the Step 8 of the guide.
Conclusion
Now you know how to implement rotating drives backup scheme fast and easy. MSP360 offers a 15-day trial without any limitations, so feel free to test the scenario by yourself. If you have any questions left, feel free to ask in the comment section below, visit MSP360 Official Forum or contact us for help.


