MSP360 Products
How to Create a Windows Server System Image Backup with MSP360
Windows Server, like any other server, requires regular backups. Manual backups are not an option, as they take up too much time and human resources. What is even more important, they put your data at risk of loss due to human error. In this article, we’ll describe how to automate Windows Server system backups with MSP360 Managed Backup.
Essentials of Windows Server Image-Based Backup
When you back up a server, it is not enough to save just files and folders. You need to make a full copy of all the partitions that contain your system files, as well as applications, services, permissions, configuration, and user data. This system image backup can also be used for bare-metal restore or recovery to a virtual machine, so it should be a complete copy of your server in a working state.
With MSP360 Managed Backup, you can create such a copy. The solution takes a server snapshot and saves the actual server state. After recovery, the work can be continued with minor data and time losses, and you won’t need to reconfigure the server or reinstall any software. MSP360 Managed Backup will automatically restore your Windows server to its previous state; you just need to choose what version to restore and where to.
Further reading Image-Based Backup with MSP360
Further reading Windows Server Backup with MSP360

Managing a System Image Backup for Windows Server with MSP360
In this guide, we’ll cover all the nitty-gritty of using MSP360 Managed Backup to protect your Windows Server environment.
How to Create an Image-Based Backup for Windows Server
We assume that you already have MSP360 Managed Backup installed on your server. If not, install it and let’s begin.
In the MSP360 Managed Backup web control panel, proceed to the Backup tab, Computers section. Find your server in the list.

Find the Action column on the right, click the icon with three dots and select Show Plans.

Click the Add New Plan button and choose Image-Based from the list to create the new backup plan or find the required plan on the list, click it and find the Edit button to make changes to it.

Give your plan a name.

Select the backup destination. You can use local or cloud storage, depending on your needs.

Select the partitions you require to back up.

In the Advanced Options section, you can exclude files or folders from the backup, change VSS options, and modify the prefetch block count.

Configure the compression and encryption options. It is highly recommended to use encryption, so that no one will be able to access your server without a password. Add a hint in case you lose or forget your password.

Consistency check and restore verification are used to ensure that your backups are recoverable. The consistency check feature reviews data in storage and notifies you if the data does not exist or has been modified, for example if it has been damaged. Restore verification does a quick restore of your server backup using a temporary Hyper-V environment to ensure that your server’s copy is recoverable.

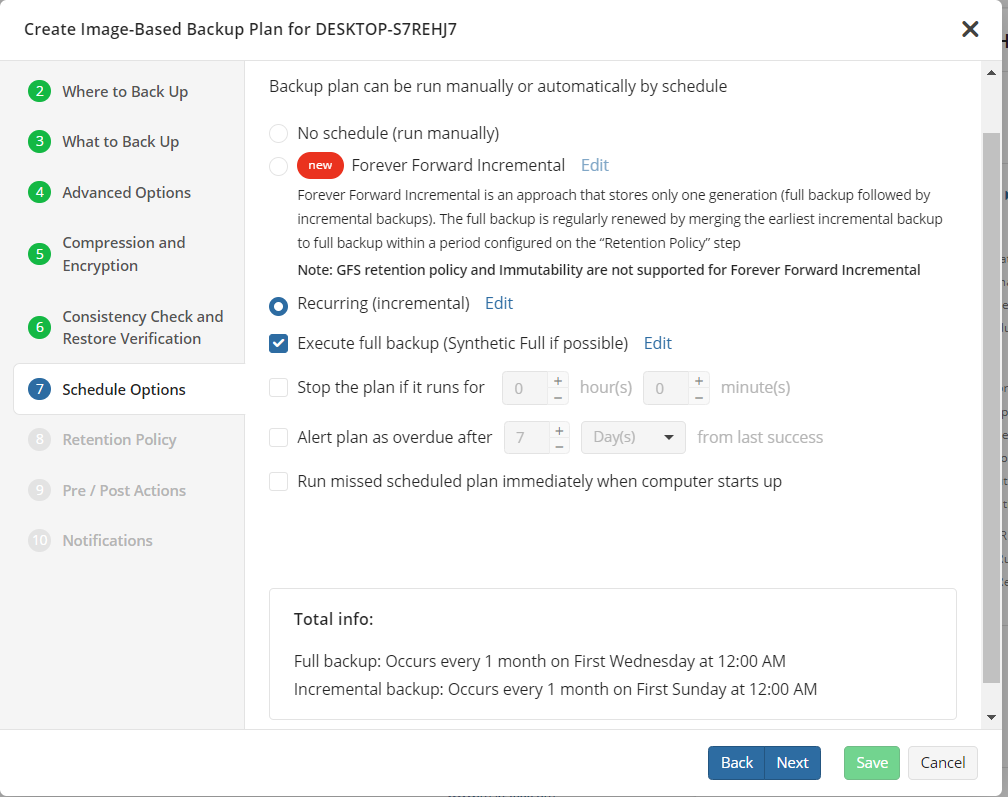
In the next step, define the schedule options. Click Recurring Incremental and set up the incremental backup frequency. The Daily type refers to weekly backups, as well, if you choose to run backups only once a week.

Click Execute Full Backup to schedule full backups. The Daily type works in a similar way to that in the previous step.

You can find your backup plan configuration summary at the bottom of the dialog. Also, you can specify the maximum time the backup plan can run for. If you want the plan to be launched at system start-up in case of a missed previous scheduled backup, mark the appropriate checkbox.

In the Retention Policy step, select how long your backups should be stored. Here, you can also enable the GFS option; GFS backups are additional full backup copies that are kept using their own retentions. On this step, you can also enable object lock to prevent a dataset from being modified or deleted within a given period of time. Please note that immutability can be enabled if it was enabled for the storage account you chose.
Further reading Immutable Data Backups Explained and How It Works in MSP360

In the Pre / Post Actions section, you can add scripts that will be executed before backup starts or when it finishes. You can also embed your server backup into a backup chain.

Change the notification options if needed. Click Save. If you have specified the schedule, MSP360 Managed Backup will automatically launch your plan at the defined time. Otherwise, you’ll need to run it manually from the Show Plans slide-in.
When the backup plan finishes, you’ll see the result in the Backup Plans slide-in.

Here, everything went fine. If any issues occur, you will be able to see the details of what happened in the Last Result field.
How to Recover an Image Backup of Windows Server
To recover a backup of Windows Server with MSP360 Managed Backup, find the Action column on the right, click the icon with three dots and select Restore plans in the slide-in that appears. Click Add New Plan and select Image-Based Restore Plan to open the restore wizard.

If you choose Run restore once, the plan will start automatically after you fill in all the required information. The Save restore plan option allows you to run the plan manually or create a schedule for it.

Select which dataset you want to restore. By default, the latest version is set up for recovery, but if you need to retrieve an earlier version, select the point in time when it was available.
On the next step, you are required to select the type of data. There are two options available:
- Restore as physical disk (use this option if you want to restore Image Backup to a physical disk)
- Restore as virtual disk (use this option to restore as virtual disk file. Later you can mount this disk as virtual drive or use in your Virtual Machine environment)

Choose the partitions to restore.

In the Destination section, you need to provide the path where your Windows Server is to be recovered to.

That’s it. Now you know how to create and recover Windows Server backups with MSP360. Our number-one backup helps keep your data safe, providing you with all the necessary tools for the purpose. Should you have any questions, please contact us.


