In this post, we explain how to move your backup data from one storage class to another on Amazon S3. There are several different methods for achieving this goal, and we walk through each one below.
Using the "Storage Class Options" Menu Item
1. Right-click on the S3 bucket you want to archive to S3 Glacier Deep Archive or an other storage class, then select Storage Class Options item in the context menu.
2. In the Object Properties box, switch to the Storage Class tab.
3. In the Use storage class drop-down menu, select the storage class you want your objects to be moved.
4. When you are finished, click Apply.
Using the “Move to Glacier” Option
1. Right-click on the S3 bucket that you want to archive to S3 Glacier storage class.
2. Select Move to Glacier.
3. In the Bucket Lifecycle dialog box, click Add.. to create a lifecycle rule for your bucket.
4. In the Bucket Lifecycle Rule dialog box, specify the path and data transition rules.
5. Select the Enable this rule check box to apply this lifecycle rule to your bucket.
6. When you are finished, click OK. Note that you can also manage Object Expiration using this dialog box. Click this link to learn more about Object Expiration. Note that the Object Expiration policy may delete files permanently, with no possibility of restoring them.
Note that your backup data may appear to be located in S3 Standard storage class, but in fact it is located in the Glacier storage class. Make sure your backup data is in the Glacier storage class and check the status in the Storage Class column (it should read GLACIER). According to Amazon's Lifecycle policy, it may take up to 24 hours to apply storage class changes.
Using Upload Rules
1. In the Tools menu, select Upload Rules.
2. In the Upload Rules dialog box, select the storage account you want to configure, then click Add.
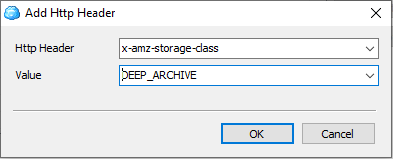
3. In the Select actions to perform when upload file to cloud storage drop-down menu, select Set HTTP headers.
4. Specify settings as shown on the screenshot below:
5. Specify file types or buckets you want this upload rule to be applied to, then click OK.
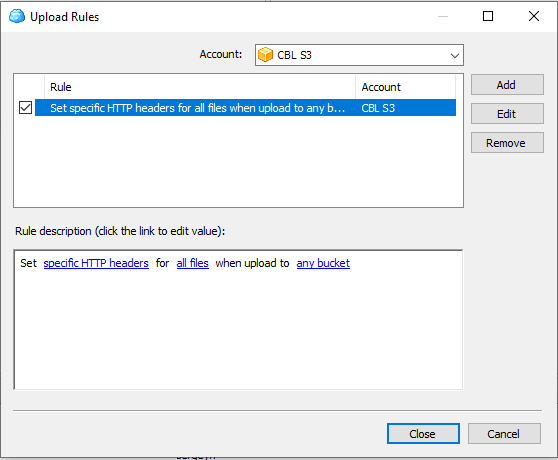
An example of a global rule applied to all files and buckets is available in the screenshot below.

Conclusion
Now you know how to move files fast and efficient between different storage classes in Amazon S3. If you have any questions - let us know in the comments below or on MSP360 official forum!


