Restore Verification in MSP360 Backup 6.1
About the Restore Verification Feature
For Image-based backups, MSP360 Backup 6.1 provides the restore verification feature (beta version). When using this feature, MSP360 Backup creates and runs a test restore plan that downloads a part of the backed up data required to start a test Windows VM created with Windows Hyper-V.
The restore verification feature lets you check the backup integrity before restoring the full backup to a real Windows machine.
Hyper-V is built into Windows as an optional component that is available in Windows 8 or higher. For Windows Server versions, Hyper-V is available in Windows Server 2008 or higher.
For instructions on how to enable the Hyper-V role for your version of OS, see Microsoft documentation. For example, appropriate instructions for Windows 10 are available - click the link to learn more.
Before Using This Feature
Before using the restore verification feature, consider the following limitations:
- The Hyper-V role cannot be installed on Windows 10 Home.
- For Windows Server versions, you can use the Restore Verification feature on computers running Windows Server 2012 or higher.
- For the test VM, in the current user temporary folder, Windows creates the Virtual Hard Drive file (.vhdx file). By default, the user temporary folder is located on the C: drive. For the test VM to work properly, ensure that the C: drive has enough space.
Using the Restore Verification Feature
To check an image-based backup integrity, perform the following steps:
- In the Home menu, navigate to the Backup Storage tab.
- In the list of backups, select an image-based backup to check.
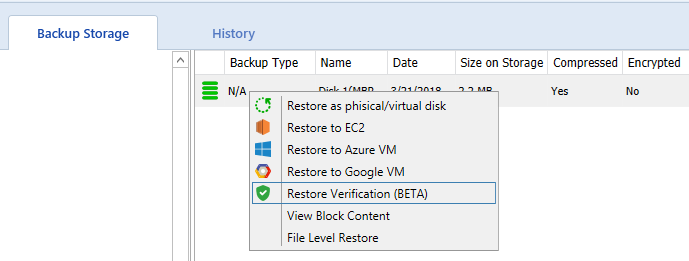
- Right-click the backup, then select Restore Verification (BETA):

This creates and runs a test restore plan that will start a Windows VM using a part of the backed up data downloaded from the cloud storage. The virtual machine state is displayed in the preview screenshot:

TIP: Optionally, to log on into VM, click the Hyper-V Console link.


