Cybercrime is evolving fast, becoming a bigger threat to businesses every day. To stay protected, companies need to strengthen their security and minimize exposure to potential attacks. Continue reading
Expanded Item-Level Restore Support for MS Exchange Server
In MSP360 Backup for Windows 6.2, the item-level restore feature is expanded with the support of item-level restore for Microsoft Exchange Server 2013, 2016 and 2019. For now, this feature improvement is available as BETA for all supported Microsoft Exchange Server versions. Continue reading
Introducing MSP360 Backup 6.2
MSP360 Backup 6.2 comes with another major update which contains a number of new features and improvements.
Real-Time Backup Functionality is at Your Service
MSP360 Backup's new real-time backup feature, called Near Continuous Data Protection (Near CDP), has been released! We warmly thank everyone who took the survey and shared their feedback with us to help create this feature.
Over the past few months, we have carefully studied our customers' use cases and started a work scope to improve the real-time backup feature. Now, the fruits of that work are ready to use.
Previously, using the Real-Time Backup feature was not recommended, but times have changed. The following issues have been worked out and solved:
- Shared folders
- NAS storage
- Microsoft Office files.
The updated functionality has already been released within the latest version of MSP360 Backup for Windows. To learn more about the changes, read this blog post.
Azure Blob Rehydration Support in MSP360 Backup 6.1.3
MSP360 Backup 6.1.3 offers the full support of the Azure blob rehydration feature which enables the prompt restore of your data from archived blob to online tier within 1 hour.
Update your MSP360 Backup to the latest version and use your Azure storage more efficiently than ever.
Introducing MSP360 Backup 6.1.1
MSP360 Backup 6.1.1 minor release adds important new features, including:
- Master password security improvement
- Storage providers revision
- Performance improvements.
Continue reading
Master Password Feature Improvement in MSP360 Backup 6.1.1
MSP360 Backup 6.1.1 is equipped with the improved master password feature.
With a master password feature enabled, all storage credentials, backup and restore plan configurations, settings are encrypted and secured with a signature. Any unauthorized actions will require to provide the master password.
The feature provides the following improvements:
- Command Line Interface is now can be protected with a master password
- Unauthorized copying of configuration files is protected with PStore (Protected storage)
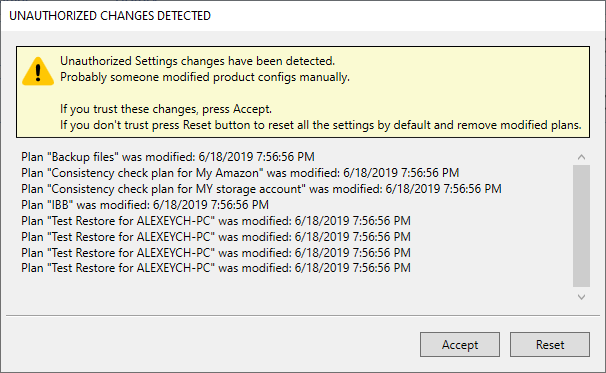
- Manual setting changes will require to provide the master password
- Password reset feature is introduced.
To Configure Master Password Settings
1. In the application menu, select Options.
2. Switch to the General tab.
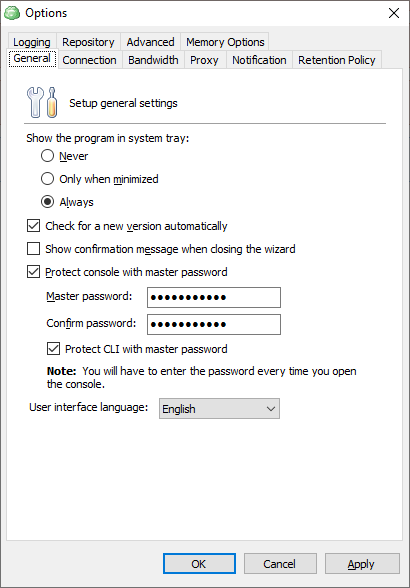
3. To specify the master password for accessing the application on each run, select the Protect console with master password check box.
4. Specify the password in the Master Password field, then in confirm in the Confirm password field.
5. To expand the master password protection for CLI usage, select Protect CLI with master password check box.
6. Click Apply.
Using Master Password in Command Line
Once a master password protection feature is expanded to CLI usage, you must use a master password to execute any CLI command.
To do it, use the -mp argument in any command.
To request the trial license under master password protection, use the following command:
cbb activateLicense -email "email" -edition "ultimate" -trial -mp [yourpass]where [yourpass] is a master password.
Reset Master Password
If you forgot your master password, you can reset it.
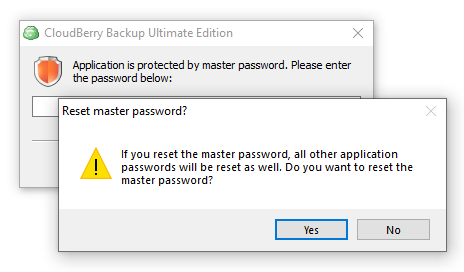
Once you run the Backup for Windows protected with a master password, in the dialog box, click Reset master password, then click Yes.
Note that once a master password is reset, all other passwords used in MSP360 Backup (for example, passwords for storage destination access), will be reset as well for security reasons.
In case of setting modifications are detected, accept them or decline in the Unauthorized Changes Detected dialog box:
Introducing MSP360 Backup 6.1
The new MSP360 Backup 6.1 is out! The new version brings a set of new features and improvements.
Azure Stack Support in MSP360 Backup 6.1
MSP360 Backup 6.1 fully supports Azure Stack as a storage destination.
Azure Stack is an extension of Microsoft Azure that provides an on-premises environment for delivering Azure services within customers' own computing facilities. It offers a consistent cloud infrastructure, providing businesses with a wide range of computing solutions and services, without the latency that can impact remotely hosted, cloud-based applications.
To Add Azure Stack as a Storage Destination
- Open the application menu, then click Add New Account.
- In Select Cloud Storage dialog box, select Azure.
- In the Azure Account dialog box, fill in your Azure credentials. Select AzureStack item in the Account type drop-down menu.
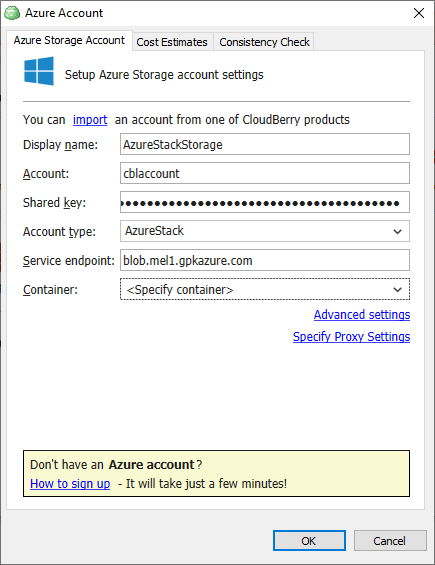
- Specify the Service endpoint.
- In the Container drop-down menu, select the Azure container for your backups or select Create New Container to create a new one.
- When you are finished, click OK.
Hyper-V Virtual Disks Exclusion in MSP360 Backup 6.1
MSP360 Backup 6.1 features updated Hyper-V support that allows users to exclude virtual disks on a virtual machine within a Hyper-V backup plan. This feature serves as an efficient tool for backup size optimization. The updated Backup Wizard offers a separate step for virtual disk selection. Continue reading
Restore Verification in MSP360 Backup 6.1
About the Restore Verification Feature
For Image-based backups, MSP360 Backup 6.1 provides the restore verification feature (beta version). When using this feature, MSP360 Backup creates and runs a test restore plan that downloads a part of the backed up data required to start a test Windows VM created with Windows Hyper-V.
The restore verification feature lets you check the backup integrity before restoring the full backup to a real Windows machine.
Hyper-V is built into Windows as an optional component that is available in Windows 8 or higher. For Windows Server versions, Hyper-V is available in Windows Server 2008 or higher.
For instructions on how to enable the Hyper-V role for your version of OS, see Microsoft documentation. For example, appropriate instructions for Windows 10 are available - click the link to learn more.
Before Using This Feature
Before using the restore verification feature, consider the following limitations:
- The Hyper-V role cannot be installed on Windows 10 Home.
- For Windows Server versions, you can use the Restore Verification feature on computers running Windows Server 2012 or higher.
- For the test VM, in the current user temporary folder, Windows creates the Virtual Hard Drive file (.vhdx file). By default, the user temporary folder is located on the C: drive. For the test VM to work properly, ensure that the C: drive has enough space.
Using the Restore Verification Feature
To check an image-based backup integrity, perform the following steps:
- In the Home menu, navigate to the Backup Storage tab.
- In the list of backups, select an image-based backup to check.
- Right-click the backup, then select Restore Verification (BETA):
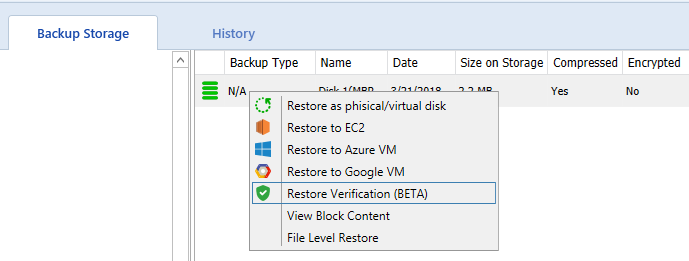
This creates and runs a test restore plan that will start a Windows VM using a part of the backed up data downloaded from the cloud storage. The virtual machine state is displayed in the preview screenshot:

TIP: Optionally, to log on into VM, click the Hyper-V Console link.
MSP360 Backup Now Supports AWS Asia Pacific (Hong Kong) Region
MSP360 Backup has been updated to include support for storing data in Amazon's Asia Pacific (Hong Kong) region. Now, you have the option of creating Amazon S3 Asia Pacific (Hong Kong) region storage buckets from MSP360 Backup. Continue reading


